canarygirl.com

August 8, 2008

Attention Potato Salad Police: Rogue Potato Salad Spotted

Filed under: eggs, gluten free, potatoes, recipes, salads, side dish, vegetables, vegetarian — nikki @ 8:17 am

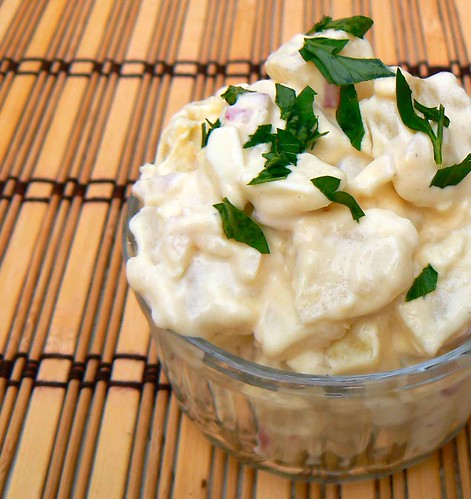
Attention all units…a rogue potato salad has been spotted at the canaryhouse.  Please use extreme caution when approaching…this salad has NO recipe.  It has NOT been tested 100 times.  If you see this salad, grab a fork and sit down quickly.  Quietly.  And apprehend that sucker before anyone tries to get in the way. 

As I’m sure you’re all aware, Melissa at Alosha’s Kitchen had a run in with the folks at Cook’s Country/America’s Test Kitchen/Cook’s Illustrated, where she had adapted a recipe of theirs, noted her changes and credited the source…but that was apparently unacceptable behavior, because their recipes are PERFECT and are not to be changed by anyone, fer cryin’ out loud.  In my opinion, they can stuff their so called perfect recipe.  Recipes are *meant* to be changed, adapted, and perfected in our own ways.  Perfection in the kitchen isn’t measured in precise measurements and techniques, it comes from being creative, being happy and having fun.  If the folks over at CC/ATK/CI don’t see that, well, there’s something wrong in *their* kitchen. 

So, with that, I offer you my humble potato salad.  I’ll give you the ingredients I used, but I’m not posting a recipe, just the ingredient list. Personal adaptation and creative expression are encouraged. I was out of celery, so there’s none in there, but hey…I worked with what I had, and it tasted freaking awesome.  SO there.  I’d also like to enter this subversive salad into this month’s Potato Ho Down Event, hosted by Evil Chef Mom

Yes indeed…not only do I have rogue non-recipes, I’m a ho too. ;) Deal with it. lol

Ingredients:

potatoes, cooked, peeled and diced
boiled eggs, peeled and chopped
red onion
garlic
celery (if you’ve got it)
mayonaise
sour cream (or quark cheese or Greek yogurt)
mustard
sugar
red wine vinegar
salt and cracked black pepper
parsley

Preparation:

Mix up the dressing ingredients and pour over chopped potatoes and eggs.
Feel free to add more stuff like peas, peppers, green onion etc.
Combine.
Taste it to make sure you like the seasonings and the tang factor.
Let sit in the fridge for an hour or so.
It’s even better the next day.


July 24, 2008

Michelle’s Incredible Lentil Salad

Do all of you know Michelle at Thursday Night Smackdown? If you don’t?  Get over to her site right now! I’ll wait.

No, seriously, I will.

Isn’t she great? She has the best sense of humor, and her blog is filled with delectable goodies ranging from appies to salads to mains to desserts. I discovered TNS a few months ago, and it has quickly become one of my “first reads” in the morning. Thursdays are “Smackdown” days. Michelle chooses a recipe from one her many cookbooks and makes it. Mondays are “Cheap Assed” days, where she uses pantry staples and inexpensive ingredients to make incredible meals for *under* *$5!* per serving. With today’s economy, that is one hell of a bonus! You may remember her Extreme Rotini and Cheese, that I am totally claiming as my own from now on (sorry Michelle! lol) As of late, she has been making meal after incredible meal…all spot on with my tastes. It’s as if she were trying to seduce me with her cooking. You’re not, are you, Michelle? lmfao I’m just teasing. It’s just that…I dunno…awesome food…swearing…getting my funny on…well, it’s just the best, that’s all. It’s like one stop blog shopping. Treats! Snark! Giggle! See what I mean?

So anyway…the other day she made this incredible looking lentil salad. Lentils! Salad! I’m so there. Not only is this salad good, it’s EXCELLENT. I even cheated. I didn’t cook my lentils with the oh so fun to make cloved onion. I used a jar of lentils. That I had in the pantry. Then added the ever so smallest pinch of ground cloves to the salad. Nobody noticed that I hadn’t spent that extra hour plus cooling time. See that? And? AND I was frugal, because I used pantry goods, as well as basil from my leetle basil plant on the patio.  I also subbed Feta cheese, because that’s what I had.  That salad was free! I had everything in the house. I bet you do, too.

Now, there are a couple of events that I want to participate in. My very good friend Shaye, at Smarter than Pancakes had a birthday recently, and would like us to bring something to her Birthday Picnic!

I’m bringing this salad. Not only because it’s freaking fabulous, but because it’s a dish that lends itself *perfectly* to an afternoon outside with friends. So, Happy Birthday, Shaye! MUAC!

Grace at A Southern Grace is also hosting an event, called Beat the Heat! 

that I’d like to participate in, seeing as it’s hot as Hades round here, and we’re all looking for refreshing dishes to combat the scorching heat of summer. The catch?  No heating up the kitchen!  Microwaves and ice-cream makers are allowed, but not the stove or oven or any other heat emitting appliance.  Grace, check this salad OUT man. Seriously. If this doesn’t beat the heat, maybe we’ll have to have a beer with it or something. ;) lol


July 16, 2008

On the Grill with La Paella Mixta

Filed under: chicken, fish, seafood, pork, poultry, recipes, rice, spanish, step by step, vegetables — nikki @ 2:16 pm

I’m sure most of you are already familiar with Paella…one of the quintessential foods of Spain. You’re probably aware that paella is made with rice, saffron, a few vegetables and seafood or meat, or a combination of the two.


The latter is what I want to share with you today…the Mixed Paella, or Paella Mixta. If you’re like me, whenever you have a meal you like to have a little bit of everything…a taste of each. Paella is perfect for that…you get delicious bites of savory rice combined with prawns, mussels, clams, squid, chicken and pork, a pepper here and there and of course, gaaaaah-lic.

Paella can be made on the stove top, or on a special serpentine heating device specifically designed for paella, on an open flame (this is the best way guys…on the beach, rocks aligned just so to support the “paellera” (paella pan), with a view of the Gods), or, as I’ve done here, on the grill! Now that summer is upon us, I’m sure you’re all looking for new and exciting things to prepare on your grills…I know I am…Alvaro bought a new, behemoth grill…seriously, it’s like at least 3 times the size of our old one. Which wasn’t small. lmao Needless to say, we’ve been grilling more frequently since this purchase, and I’ve grown tired of steaks and burgers. Paella to the rescue! I’d love to hear your grill suggestions, guys….I really need new ideas. What’s your favorite thing to make on the grill? :)

Here’s what you’ll need (approximately):

1 paellera (or other wide, flat grillproof dish–mine is 34cm)

Ingredients:

good olive oil
4-5 cloves garlic, minced
1 onion, minced
1 pepper, minced
a few thyme sprigs
1 bay leaf
1 small spoonful of Spanish paprika (sweet or smokey, your choice)
6-8 chicken wing drumettes
1/2 pound lean pork, in bite sized pieces
a generous pour of white wine (dry, table wine)
2 packets saffron threads (about 15 threads or so?)
2 cups arborio or other short grained, rounded rice
4 cups chicken broth
sea salt to taste
1 small to medium sized squid, cleaned and cut into rings–don’t you dare throw away those tentacles. I might have to come after you
1 pound clams, soaked in saltwater overnight to remove grit
5-6 mussels, soaked to remove grit, beards removed
1 pound prawns, thoroughly washed
1/3 cup frozen peas

Ya got all that? Whew! lol

Preparation:

First, you’ll need to season your paella pan. I like to buy the regular old metal kind. This means that they need to be seasoned first, much like a cast iron pan or wok. To season it, just lightly oil it, and rub it with a paper towel until mostly absorbed. There should be a thin layer of oil remaining on the surface, but just barely. You’ll need to repeat this after washing, so that your paella pan doesn’t rust.

Ok. Are we seasoned? Good. Let’s get cooking!

Drizzle your paellera with some extra virgin olive oil.
Toss the garlic in first, to lightly brown.

Once the garlic is nice and golden, add in the onion, pepper, thyme and bay.

Give it all a good stir, and keep at it until the vegetables are tender.
Add in the paprika and stir again.
Now push the vegetables to one side, and add in the chicken and pork.
You might want to lightly oil the paellera on that side again first.
Season with salt and pepper and brown.
When the meat is nice and browned, add in the wine. I can’t tell you exactly how much…just enough to coat the bottom…probably a good cup to 2 cups?

Add in the saffron and stir around.
Reduce this a bit.
Now add the rice and give it a good stir. Really good, because pretty soon I am going to take the spoon away from you. No, I’m not kidding. lmfao
Add the broth.

Arrange your chicken wings now, because you need to retire your spoon until the cooking has finished. I’m serious, now. Resist all urges to stir your paella. It’s imperative for the delicious crust or “costra.”
NO MORE STIRRING!

I MEAN IT! lmao

After about, oh, 10 minutes your paella should be bubbly and goooood looking, like this:

Now it’s time to arrange the seafood on top.

Just put it on there how you want to…I had some leftover prawns, so I threw them on the grill along side the paella for some impromptu pepper shrimp.

When your paella is just about done, throw on a generous handfull of frozen peas.


Let it cook until done (you’re allowed to poke a fork in there and check lol)
Once your paella is done, you’ll need to check to be sure there aren’t any unopened clams or mussels. Unopened clams/mussels = very, very bad. Throw them out.

Bad mussel:

Good mussel:

Now it’s time to serve!  Just pile a bunch on your plate and serve with a wedge of lemon and a nice hunk of bread.

BTW…that black stuff at the right? The “costra.” Ideally it should be brown, not black, but I overcooked. Ooops! :P

Ps…after you’ve washed your paella pan, you’ll need to season it again to prevent rusting.

July 10, 2008

General Tso’s Chicken…possibly the best food ever.

Filed under: asian, broccoli, chicken, poultry, recipes, rice, vegetables — nikki @ 9:58 am

A recipe!  Can you believe it?  The last couple of posts were just chatting chatting chatting.  What happened to the food on this food blog?  It is here.  Waiting.  Screaming to be posted. 

I must warn you…they are coming for my ghetto computer today.  Coming to take it away, to cart it off to mainland Spain, Madrid to be exact, to be fixed.  What the hell kind of lame service is that?  I have to send my computer to Madrid, *without* parental supervision (dammit!).  I may not see it again for up to 2 months say the customer service representatives.  I have begged and pleaded with Alvaro (da hubs) to see if he will use his wondertech powers to fix the pc in the meantime, because OH. MY. FREAKING. GAWD! I can’t be without a computer for 2 months! *eyes twitching* *feeling woozy*  Wish me luck, folks.  Wish. Me. Luck.

Ok, enough bitching and moaning.  The recipe I am posting for you today is General Tso’s Chicken.   Crispy bites of chicken dancing around in a delightfully sticky, sweet and spicy, with just a hint of tang sauce, and some freshly steamed broccoli on the side.   This lovely stuff is then served with perfectly fluffy steamed rice and some fresh spring onion for contrast.  Are you hungry yet? 

How about now? lol

Ingredients:

2 pounds (1kilo) boneless skinless chicken, cut into bite sized cubes
2 eggs
1/4 cup cornstarch (or a little more)
salt and pepper to taste
1/3 cup soy sauce
5 cloves garlic, minced
a generous knob of ginger, minced (about 2-3 tablespoons or so, to taste)
1/4 cup hoisin sauce
2 tablespoons sugar
2 tablespoons rice vinegar
1 tablespoon mirin or sherry or white wine (whatever you have on hand)
1 cup cornstarch
thai birds’ eye chilies to taste
1 bunch green onions, chopped
1 head broccoli florets, steamed
6 cups steamed rice (more or less)

Preparation:

Beat the egg with the salt and pepper and cornstarch until thoroughly combined.
Pour over chicken and mix through.
Let this rest for about 15 minutes or so, while you chop what needs to be chopped, mince what needs to be minced and mix up the sauce.
Whisk together the soy, garlic, ginger, hoisin, sugar, vinegar and wine and set aside.
Dredge the chicken pieces in cornstarch, shaking off excess. I like to use the ziplock bag trick (place cornstarch and chicken in a large ziplock bag and shake it like you mean it) for this, because it’s faster, less messy, and a nice little aerobic workout for my flabby arms. lmfao
Heat about 3 cups of oil (I like to use sunflower, but peanut or soy work too) in your wok to just below the smoking point.
CAREFULLY add chicken, piece by piece (so they don’t stick together). Use tongs to do this, so you don’t burn yourself.
Fry chicken until just cooked through (it doesn’t need to be really browned, just cooked), then remove with a spider or slotted spoon and drain on paper towels. You’ll probably have to do a few batches.
When all the chicken is cooked and being drained of excess oil, drain out most of the oil from the wok. Leave just a bit to coat the bottom, not too much.
Add the sauce ingredients and chilies and stir around (still over high heat) until it thickens into a glaze like consistency.
Add in the chicken and toss it around to coat.
Add green onion and toss again.
It’s done!
Serve over rice with steamed broccoli.

Pollo al estilo “General Tso”

Ingredientes:

1kilo pechuga de pollo, en daditos
2 huevos
4 cucharadas de Maicena
sal y pimienta al gusto
1/3 vaso salsa de soja
5 dientes de ajo, majados
jengibre fresco, unos 3-4 cucharadas ralladas
1/4 vaso salsa hoisin
2 cucharadas azúcar
2 cucharadas vinagre de arroz
1 cucharada mirin, jerez o vino blanco, lo que tengas a mano
1 vaso Maicena
pimientas piconas al gusto
1 manojo de cebolletas, picadas
1 cabeza de brécol, en ramitos
6 vasos arroz cocido al vapor (mas o menos)

Elaboración:

Batir los huevos junto a la sal, pimienta y maicena hasta que esté homogéneo.
Verter sobre el pollo y mezclar bien.
Dejar unos 15 minutos, mientras picas lo que tienes que picar, majes lo que tienes que majar y prepares la salsa.
Con las varillas, mezclar la salsa de soja con el ajo, jengibre, hoisin, azúcar, vinagre y vino.
Reservar.
Pasar el pollo por la Maicena, sacudiendo el exceso. A mi me gusta utilizar un método super técnico para esto…el de meter todo dentro de una bolsa y moverlo como una loca hasta que esté combinado… porque es más rápido, ensucia menos, y me ahorra un poquito de aerobic para estos brazos.
Calentar unos 3 vasos de aceite (me gusta de girasol, pero de cacahuete o soja también están bien) en el wok hasta casi el punto de humo.
CON MUCHO CUIDADO añadir el pollo, pieza por pieza (para que no se peguen). Utilizar las pinzas para hacerlo, para que no te quemes.
Freir el pollo hasta que esté cocinado (no tiene que estar muy dorado, solamente cocinado), y a continuación retirar con una espumadera y escurrir sobre papel de cocina. Probablemente, vas a tener que hacer un par de tandas.
Cuando esté todo esto hecho, retirar la mayoría del aceite del wok. Dejar solo un poco para cubrir el fondo, no demasiado.
Añadir la salsa y las pimientas piconas y mezclar bien sobre fuego fuerte, removiendo hasta que se espese.
Añadir el pollo y darle unas vueltas para cubrirlo con la salsa.
Añadir la cebolleta y darle unas vueltas mas.
Ya está!
Servir sobre arroz al vapor con una guarnición de brécol al vapor.


June 9, 2008

Extreme Rotini and Cheese and a Gaw-jis Meatloaf

Filed under: asparagus, beef, cheese, pasta, recipes, sauces, side dish — nikki @ 7:30 pm

“So what in the Sam Hill is Nikki doing making meatloaf and mac and cheese in the summer for?” you ask? Well. Even though the temps are soaring, and the sun is blazing, I braved the house heating oven. For One Reason. Michelle, at Thursday Night Smackdown posted her oh so decadent creamy cheesy rotini. Did you see that stuff?! I may have slobbered all over myself. And cried with envy at that dish. She is such a fabulously funny writer, making *thee* most amazing of foods. I mean, this gal makes $55 sticks of butter for recipes, folks. Michelle is also the poached egg Master (Madame? Mistress?).  I bow down to her talents, people.  Seriously. 

So back to the Cheeeese….the Rotini and Cheese…I followed Michelle’s recipe pretty closely, though I did make a few changes, which I’ll note here:

Ingredients:

1 1/2 pounds (750 grams) rotini
1/2 cup butter
a few saffron threads
1/2 cup flour
1 1/2 quarts (1 1/2 liters) milk
2 cups grated white Cheddar
1 cup grated Gouda
2/3 cup freshly grated Parmigiano Regiano
1 tablespoon garlic powder
plenty of freshly cracked black pepper
a spoonful of sweet Spanish paprika
a generous grate of nutmeg
2 chicken bouillon cubes, crumbled
2 tablespoons butter, melted
1 cup seasoned bread crumbs

Preparation:

First, preheat your oven to about 350ºF/175ºC and get your pasta water boiling.
While this is getting started, get your sauce going.
Heat butter over medium heat.
Remove from heat and add saffron threads.
Stir this around a little bit so the saffron releases it’s color and aroma.
Add flour and whisk until creamy.Add the bouillon (be sure it’s pretty powdery, and whisk it through)
Add a bit of milk and whisk until thoroughly combined.
Add remaining milk and return to heat.
You’re going to have to whisk this pertnear (that’s a Minnesotan word, guys…it means “almost.”) constantly until it heats through and begins to thicken.
This will happen after about 10 minutes or so.
When the sauce is just beginning to thicken, add the remaining seasonings and stir through.
Now it should really start to thicken up.
Remove from heat and add the cheeses.
Taste a spoonful (or 5) to make sure the seasonings are right.
You might need to taste some more spoonfuls to be sure.
Once you’ve gotten the sauce right, cover and set it aside.
Your noodles should be about done by now, right?
Drain them and add them to the sauce.
Stir it all up.
Pour this into an oven proof dish.
Now, melt a couple of tablespoons of butter in the mic quick.
Add the melted butter to the bread crumbs and mix it up really well with a fork, until it has a sandy texture and appearance (yum! let’s eat sand!).
Sprinkle this all over the top of the noodles and cheese.
Bake about 20 minutes or until browned and bubbly.
See that?

“So what about this so called ‘gaw-jis’ meatloaf?” you ask…”And anyway, who the hell has ever seen a beautiful meatloaf?”  No one has.  It just isn’t possible, because meatloaf is ugly assed food.  But I don’t care, because it is really, REALLY good.  Meatloaf may not be beautiful on the *outside,* but it sure is gorgeous when you take that first tender bite, seasoned just so, with a kick of Sweet Baby Ray’s slathered over the top for good measure. 

Now that’s good eatin’.

Ingredients:

2 pounds (1 kilo) ground beef
1 egg
2/3 cup seasoned bread crumbs
1 cup milk
garlic powder…lots, at least a tablespoon
1/2 envelope of Knorr Onion soup mix
a bunch of cracked black pepper
a good splash of Worcestershire sauce
a good splash of HP Sauce (or Heinz 57, or A1)
Sweet Baby Ray’s bbq sauce to cover the top

Preparation:

Preheat oven to 350ºF/175ºC.
In a large bowl, mix everything except bbq sauce really well.
You may need to use your hands for this, it’s just easier.
Spread the meat mixture into a loaf pan, or make a free form loaf on a lipped baking sheet or jelly roll pan.
Cover with bbq sauce.
Bake for about an hour, until cooked through.
Drain off excess liquid and allow to rest, covered for about 15 minutes.
Slice and serve.

I decided to serve this with some steamed asparagus, bathed in butter and lightly seasoned with sea salt and cracked pepper.

Man. This is living. So THAT, my friends, is why I made rotini and cheese and meatloaf in the summer. I bet you anything you want to do the same right about now. LOL ;)

Proximamente…las recetas en español. :)


June 5, 2008

Mo Taaaahts! Spinach and Feta Tartlets

Ok, so that was my sad attempt at an English accent. LOL Did you hear it? Was it close? The other day my friends were giggling at my accent from the video I posted…they said I have a combination of Minnesotan and Spanish accents (Spanisoooodan, hey? hehe)…I dunno. I don’t think I have one. :P LMAO

Anyway, about those taaaahts…one of the best fillings for pretty much *anything* is the spinach and feta combo. Spanakopita, quiche, tarts, omelettes, bread…I love the way the tangy feta contrasts with the delicate flavor of the spinach. And? It’s practically health food, what with all the calcium, folic acid and other nutrients these little babies provide. The filling is so quick and easy to throw together, too. Now, put this healthy and delicious stuff into some puff pastry…What’s not to love?

I’d also like to submit these little delights to this month’s Monthly Mingle Event (this month’s theme is appetizers) at Mansi Desai’s site, Fun and Food.  This fun event was started by Meeta at What’s for lunch, Honey?.  Go and check out the event and these great blogs! :)


Just look at that flaky goodness!  Let’s get started making them.

Ingredients:

2 tablespoons butter
2 cloves garlic, minced
1 onion, minced
1 pound (400 grams) frozen spinach, squeezed dry
1 bunch spring onions, chopped
2 tablespoons dill
juice from 1 lemon
1/2 pound (200 grams) feta cheese, crumbled
1 egg
salt and pepper to taste
1 sheet puff pastry, cut into 9 equally sized squares

Preparation:

Preheat oven to 350ºF/175ºC.
Lightly oil muffin tins or ramekins with olive oil.
Heat butter over medium heat and saute garlic until golden.
Add onion and saute until soft.
Add spring onion and spinach and stir well.

Remove from heat and add dill, lemon juice and cheese, and then season with salt and pepper to taste.
Stir in egg, beaten.  Look at this filling!

Line muffin tins with a square of pastry, and put a bit of filling on each.
Pinch the corners together, leaving a little breathing space (you can see this here).
Bake about 20-30 minutes or until golden.

Tartaletas de Espinacas

Ingredientes:

2 cucharadas mantequilla
2 dientes de ajo, majados
1 cebolla, picada
400 gramos espinacas congeladas, completamente escurridas del agua
1 manojo cebolletas, picadas
2 cucharadas eneldo
zumo de 1 limón
200 gramos queso feta, desmenuzado
1 huevo
sal y pimienta al gusto
1 lámina de hojaldre, cortada en 9 cuadrados

Elaboración:

Precalentar el horno a 175ºC.
Engrasar unas flaneras individuales con un poco de aceite de oliva
Calentar la sartén y dorar el ajo en la mantequilla.
Añadir la cebolla y sofreir hasta que esté tierna.
Añadir la cebolleta y las espinacas y remover bien.
Retirar del fuego y añadir el eneldo, el zumo, el queso y salpimentar.
Añadir el huevo batido y mezclar bien.
Forar cada flanera con una pieza de hojaldre.
Poner un poco del relleno en cada una y cerrar las puntas.
Hornear durante 20-30 minutos o hasta que estén doradas.


Next Page »