canarygirl.com

August 13, 2008

Tapas! Tapas! Pulpo a la Gallega

Filed under: appetizers, fish, seafood, gluten free, recipes, spanish, tapas — nikki @ 9:44 am

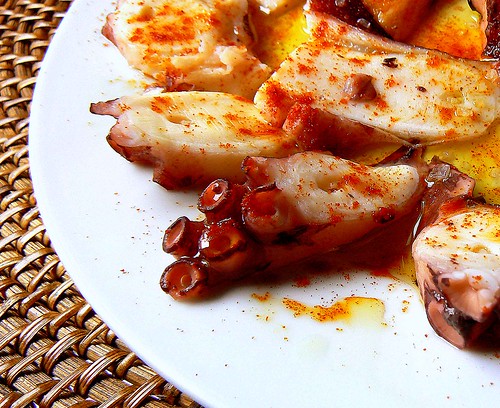
Mmmmmmmmm….Delicious tentacley octopussy goodness.  (holy crap, that sounded way dirtier than I intended it to. :| )  Most places that serve tapas have a few standard items that appear on every menu, regardless of where you are in Spain.  Some of these would include a selection of local and national cheeses, Serrano ham, garlic shrimp (gambas al ajillo) and of course, Galician Octopus, or “Pulpo a la Gallega.”  Pulpo can be served hot or room temp, with potato slices or without, but always includes the finest olive oil, spicy paprika and sea salt.  It really is incredibly simple to make, and is incredibly cool looking on the plate.  Oh, come ON.  You KNOW you want to see your guests faces when you tell them you’re going to serve octopus tentacles.  And, what’s even better, is that once you’ve finally convinced the more faint of heart of your diners to “at least TRY it!”, the look of pleasure that will inevitably overcome their faces when they do partake of these tender morsels, with just a hint of bite from the spice and the sea salt…well that right there is priceless.

My mil makes the best pulpo…perfectly tender every time.  Do you know how she does it?  In the rice cooker.  Yep.  The rice cooker.  Hers it the old school kind…it looks like a crockpot sort of thing, she fills the outer portion with water, pops that octopus in there and steams it.  Perfect every time.  I don’t have a rice cooker (not that I don’t *want* one, mind you…it’s just that my tiny kitchen only allows for a certain number of toys, and this one isn’t really one I find necessary.  Convince me otherwise if you think I’m mistaken….I could be swayed. lol), so I resort to cooking the octopus in a soup pot.  To ensure a tender octopus, be sure to have frozen it first, then thawed, if buying fresh.

So are you ready to join me?  Let’s make that Octopus.

Ingredients:

2 pounds (1 kilo) whole octopus
1 onion
2 bay leaves
2 larger potatoes, boiled and sliced diagonally into rounds (about 1/2″ in thickness or less) **optional
spicy paprika to taste
sea salt to taste
extra virgin olive oil

Preparation:

Fill a large soup pot with water, enough to submerge the octopus.
Cut onion in half and add to water, along with the bay leaves.
Some will say that also adding a wine cork (yes a wine cork) will ensure a tender octopus.
You are within your rights to use your culinary judgement on that particular point. lmfao
Bring the water to a rolling boil, and submerge the octopus.
Bring it back to a boil, and remove the octopus.
Repeat this step 2-3 more times. You basically want to scald the octopus.
Bring the water back to a boil and place the octopus in the water.
This time we will leave it in there.
Reduce heat to a simmer, and cook the octopus 20 minutes– a larger octopus will require longer cooking time– up to 45 minutes.
Remove from water, and thinly slice into diagonal slices (the result should be an oval slice).
If using, arrange potato rounds on a plate or wooden serving tablet and top each with a slice of octopus.
Drizzle with extra virgin olive oil, then liberally sprinkle with spicy paprika and sea salt.

Ingredientes:

1 kilo pulpo
1 cebolla
2 hojas de laurel
2 papas cocidas, cortadas en rodajas **opcional
pimentón picante al gusto
sal gorda al gusto
aceite de oliva extra virgen

Elaboración:

Llenar un caldero con agua suficiente como para submerjir el pulpo.
Partir la cebolla por la mitad, y añadirla al agua, junta a las hojas de laurel.
Hay gente que diga que añadiendo un corcho de una botella de vino asegura un pulpo tierno.
Estás en tus derechos culinarios usarlo o no a la hora de decidir añadirlo. jajaja
Llevar el agua a ebullición y submerjir el pulpo.
Llevarlo a hervir otra vez y sacar el pulpo.
Repetir 2-3 veces mas. Basicamente, quieres escaldar el pulpo.
Llevar el agua una vez mas a hervir y submerjir el pulpo.
Ya esta vez lo dejamos en el agua.
Reducir el fuego a minimo, y cocinar el pulpo duranto unos 20 minutos–un pulpo mas grande requiere mas tiempo…hasta 45 minutos.
Retirar el pulpo del agua y cortar en rodajas ovaladas finitas.
Si utilizas las papas, colocarlas en el plato de servir, y tapar cada una con una rodaja de pulpo.
Rociar todo con el aceite de oliva virgen y espolvorear con el pimentón picante y sal gorda.
August 10, 2008

Who Says You Can’t Have an Orchard in the City?

Filed under: cherries, fruit, gardening, lemons, oranges, peaches — nikki @ 9:25 am

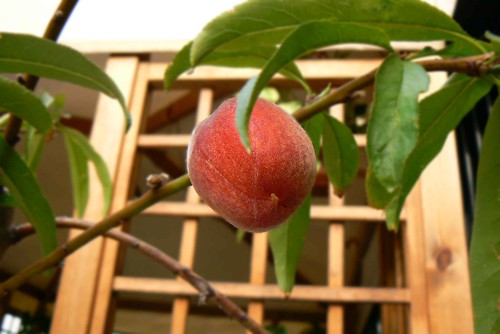
Wouldja look at that succulent beauty?

So, one of the things we did on my recent birthday was to go to a local nursery.  I have had my heart set on having fruit trees forever, and decided that we should try our hands at growing some potted trees on our patio.  The gardener at the nursery was so helpful, and seemed confident that fruit trees would thrive as long as we water them regularly and give them plenty of sun and an occasional dose of fertilizer.  We chose a peach tree, a cherry, a lemon and an orange.  So far, the peach and the orange are showing immediate results!  The peach tree had a few tiny green beginnings of peaches when we bought it, and the orange tree had a nice sized green orange, but nothing else.  After only a few weeks, the peaches have really grown, and are beginning to ripen.  The smell is incredible!  Luscious, succulent, juicy peaches just waiting for the perfect moment to be made into something fabulous. 

The orange tree is blossoming

and has several baby oranges beginning to form,

and the lemon has one lone blossom…hopefully, Miss Lemon will show the same enthusiasm as her sister the orange soon. 

Look at that honker!  I wonder when it will turn orange?

The cherry…well, cherry season is already over, so no blossoms or fruit, but she’s looking healthy for the most part.  I think.  lol  Maybe I should start singing Cherry Oh Baby to her?  A little UB never hurt anybody…in fact they make me pretty darned happy, so maybe they’d work on her as well. ;)

So, what do you think of our little inner-city orchard? :)


August 8, 2008

Attention Potato Salad Police: Rogue Potato Salad Spotted

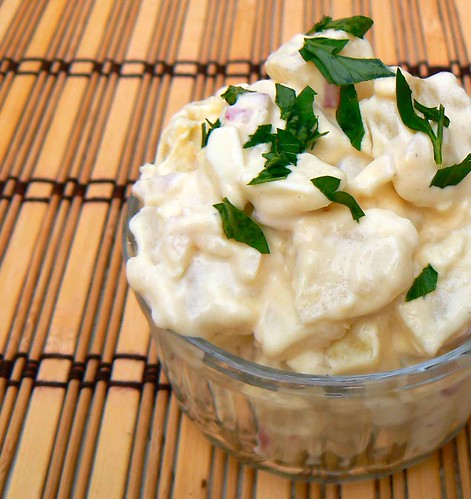
Attention all units…a rogue potato salad has been spotted at the canaryhouse.  Please use extreme caution when approaching…this salad has NO recipe.  It has NOT been tested 100 times.  If you see this salad, grab a fork and sit down quickly.  Quietly.  And apprehend that sucker before anyone tries to get in the way. 

As I’m sure you’re all aware, Melissa at Alosha’s Kitchen had a run in with the folks at Cook’s Country/America’s Test Kitchen/Cook’s Illustrated, where she had adapted a recipe of theirs, noted her changes and credited the source…but that was apparently unacceptable behavior, because their recipes are PERFECT and are not to be changed by anyone, fer cryin’ out loud.  In my opinion, they can stuff their so called perfect recipe.  Recipes are *meant* to be changed, adapted, and perfected in our own ways.  Perfection in the kitchen isn’t measured in precise measurements and techniques, it comes from being creative, being happy and having fun.  If the folks over at CC/ATK/CI don’t see that, well, there’s something wrong in *their* kitchen. 

So, with that, I offer you my humble potato salad.  I’ll give you the ingredients I used, but I’m not posting a recipe, just the ingredient list. Personal adaptation and creative expression are encouraged. I was out of celery, so there’s none in there, but hey…I worked with what I had, and it tasted freaking awesome.  SO there.  I’d also like to enter this subversive salad into this month’s Potato Ho Down Event, hosted by Evil Chef Mom

Yes indeed…not only do I have rogue non-recipes, I’m a ho too. ;) Deal with it. lol

Ingredients:

potatoes, cooked, peeled and diced
boiled eggs, peeled and chopped
red onion
garlic
celery (if you’ve got it)
mayonaise
sour cream (or quark cheese or Greek yogurt)
mustard
sugar
red wine vinegar
salt and cracked black pepper
parsley

Preparation:

Mix up the dressing ingredients and pour over chopped potatoes and eggs.
Feel free to add more stuff like peas, peppers, green onion etc.
Combine.
Taste it to make sure you like the seasonings and the tang factor.
Let sit in the fridge for an hour or so.
It’s even better the next day.


August 6, 2008

Squisito! Risotto al Nero di Seppia

Filed under: cheese, fish, seafood, gluten free, italian, recipes, rice, spanish — nikki @ 9:23 am

Ok, so how’s my Italian so far? hmmm?  lol  Italian is such a beautiful language…just hearing it makes me happy.  The way the words flow, and the intonation, well, it’s a language I would love to learn.  Languages have always fascinated me…ever since childhood I wanted to learn Spanish, and once in high school, I found that I loved it!  Then, I moved on to French…and after that, Japanese in college.  Italian has been on my list of things to learn, though, for quite a long time.  I wonder if it’s possible to teach one’s self a language?  Probably not, huh? lol  Some day.  Some.  Day.  In the meantime, cooking Italian dishes and coming up with corny Italian titles for them will have to suffice. hehe (**let me clarify…I am NOT fluent in all of these languages…only English and Spanish! lol  I have only studied them, and love them. :D )

Risotto Negro, or “Black Rice,” is another one of the things we ordered on our night out.  At the restaurant, they served it with pan seared monkfish, but, I thought that prawns would be better suited.  I like monkfish when it’s prepared to mock lobster, but other than that….not so much.  (Do you have any suggestions for improving the texture?  It always seems so rubbery.  yuck :P )  This particular variation of Risotto is made with squid ink, which gives it its signature color.  If you’ve never tried squid ink, please consider it.  It has such a divine, subtle flavor…just hinting at the taste of the squid (calamaro or seppia).  Even Mr. Picky Pants loves this rice–and that, my friends, is saying something. lol

So let’s get cooking, shall we?

Ingredients:

2-3 tablespoons extra virgin olive oil
2 tablespoons butter
3-4 cloves garlic, minced
1 large onion, minced
2 very ripe tomatoes, peeled, seeded and diced
1 roasted red pepper, diced
2 cups rice
1 cup dry white wine
4-6 cups fish stock (I used prawn stock I had in the freezer–the amount will vary depending on your tastes)
3 envelopes of squid ink (12 grams total), or 3 squid ink sacks
1 cup parmesan cheese, freshly grated
2 pounds (1 kilo) prawns, steamed
alioli to garnish

Preparation:

Before anything, combine the squid ink packets with a small amount of water and thoroughly combine.
Reserve.
Heat oil and butter over moderate heat.
Saute garlic until golden, then add onion, tomato and pepper (save a little bit of pepper for garnish).
Continue to saute until tender, then add in rice and stir well for about 2-3 minutes.
Add wine and reduce, stirring constantly.
When wine is absorbed, add broth, ladle by ladle waiting for the liquid to absorb before adding more. You’ll need to stir this constantly as you cook it, to avoid sticking and burning.
When the rice is nearly done (depends on how you like your rice, and whether you like it drier or with more of a brothy feel), add in the squid ink mixture and thoroughly combine.
Test your rice for seasoning, and adjust salt and pepper.
Add in the parmesan and stir to combine.
Remove from heat and serve immediately, garnished with steamed prawns, chopped roasted peppers and alioli.

Ingredientes:

2-3 cucharadas aceite de oliva virgen
2 cucharadas mantequilla
3-4 dientes de ajo, majados
1 cebolla grande, picadita
2 tomates maduros, pelados, sin semillas, y picados
1 pimiento rojo asado, picado
2 vasos arroz
1 vaso vino blanco seco
4-6 vasos fumet de pescado (Utilicé fumet de langostinos que tenía congelado. La cantidad varía dependiendo de los gustos de uno)
3 paquetes tinta de calamar (12 gramos en total), o 3 bolsitas de tinta de calamar
1 vaso queso parmesano, recién rallado
1 kilo langostinos, cocinados al vapor
alioli para acompañar

Elaboración:

Antes que nada, mezclar los paquetes de tinta con un poquito de agua.
Reservar.
Calentar el aceite y la mantequilla sobre fuego medio alto.
Sofreir el ajo hasta que esté dorado, y a continuación, añadir la cebolla, el tomate y el pimiento (reservar un poco de pimiento para adornar después).
Seguir sofriendo hasta que esté todo tiernito y a continuación añadir el arroz, removiendo constantemente.
Añadir el vino y reducir, removiendo constantemente.
Cuando se haya absorbido el vino, añadir el fumet de pescado poco a poco (cucharón a cucharón) asegurando que se haya absorbido todo el líquido antes de añadir mas. Tendrás que removerlo constantemente para evitar que se pegue ni que se queme.
Cuando el arroz esté casi hecho (dependiendo de como te gusta el arroz…mas seco o mas caldoso), añadir la mezcla de tinta de calamar y remover bien.
Comprobar el sazón y rectificar la sal y la pimienta.
Añadir el queso parmesano y remover bien.
Retirar del fuego y servir de inmediato, adornado de langostinos, pimientos asados y alioli.


July 30, 2008

Spicy Chicken Mexi-burgers with Red Bean “Salsa”

Filed under: burgers, chicken, kidney beans, legumes, poultry, recipes, salads, sandwiches, tex-mex — nikki @ 9:33 am

So, here at the canaryhouse, we *love* experimenting with new ways to have burgers.  Not that regular burgers aren’t perfect or anything.  I mean, they are, of course.  Mondays are my busiest day, because I have to restock the pantry after a weekend of intense raiding.  I kid you not, on Monday mornings my cupboards are as bare as Old Mother Hubbard’s, with the exception of the odd can of tomato paste and jar of olives.  The food just seems to evaporate!  So, bright and early every Monday morning, I have to rush off to the markets to replenish the depleted stocks.  One might think, “That isn’t so difficult, why does it take this dipwad a whole day to do that?”  And it’s true.  I mean, if I only had to go to the supermarket, that would be one heck of a long time.  But here’s the thing.  In my neighborhood, we have the organic supermarket, the butcher, the bakery (fresh baguettes and breads of all kinds..yum), the fruit/veggie vendor and the “regular” supermarket.  I need things from all of these places.  Well, “need.”  “Want” is probably a better adjective.  But I tell you, if you could have all of these wonderful places within walking distance, wouldn’t you make the effort to go where the quality and prices are optimal?  So *that’s* why it takes me all day to refill the pantry.

So, is there a point to this story?  Ah yes…there is.  Since food shopping takes up most of my Monday mornings, I’m left with a “What can I make super quick, yet still appealing to Hubs and Kids?” dilemma.  Often times, it’s burgers.  But…I tend to get sick of things fairly easily.  So, in order to shake things up a little, I’m always thinking up new ways to make them, and am on the lookout for others’ ideas as well.  As luck would have it, Terry B, over at Blue Kitchen had posted an incredible looking spicy turkey burger last week.  Well that baby went straight onto the shopping list.  Hell yeah.   I took his recipe and ran with it (as I am wont to do lol).  Thank you for a fantastic recipe, Terry!  We loved it. :D

Ingredients for Burgers:

2 pounds (1 kilo) ground chicken breast
3 cloves garlic, minced
1 large red onion, finely minced
1 egg
2/3 envelope of chili powder (about 2-3 tablespoons)
1 tablespoon ground cumin
1 bunch cilantro, chopped
cayenne pepper to taste
salt and pepper to taste
8 buns, toasted (brush them with a bit of butter, garlic powder and cayenne powder)
8 slices white cheddar cheese
chopped lettuce
1 cup sour cream (or Greek yogurt or Quark cheese)
more chopped red onion
red bean salsa (recipe to follow)

Preparation:

Combine burger ingredients through salt and pepper thoroughly.
Let rest in the fridge for about a half an hour or so.
(make the red bean salsa and toast the buns while you wait)
Form 8 patties, and fry over medium high heat (use a grill pan if you have one). You might need a slight drizzle of oil on the pan so the burgers don’t stick. Also, dampen your hands with water, and the burgers won’t stick to them. Yes, I’m just chock full of tips today. lmfao
Fry about 3-4 minutes per side, until cooked through.
Serve burgers topped with a slice of white cheddar, lettuce, a generous dollop of sour cream, some more onion and some red bean salsa. I also chopped up some avocado and threw that on mine. It was goooooood. :)

Ingredients for Red Bean Salsa:

1 can kidney beans, drained and rinsed
2 roma tomatoes, seeded and diced
2 tablespoons minced red onion
1 clove garlic, minced
1/2 cup sweet corn
1/3 envelope chili powder (about 1 tablespoon)
2 tablespoons chopped cilantro
juice from 1 lemon
cayenne pepper to taste
salt and pepper to taste

Preparation:

Toss everything together and let rest until ready to eat! (This was even better the next day)

——————————————————————————–

Ingredientes para las hamburguesas de pollo:

1 kilo pechuga de pollo (molida/picada)
3 dientes de ajo, majados
1 cebolla roja grande, picadita
1 huevo
2/3 paquete de sazón para chili (2-3 cucharadas)
1 cucharada comino molido
1 manojo cilantro, picado
guindilla molida al gusto
sal y pimienta al gusto
8 panecillos de hamburguesa, tostados (pintar con un poco de mantequilla, ajo en polvo y guindilla molida)
8 lonchas de queso Cheddar blanco
lechuga troceada
1 vaso nata ácida (o yogur Griego, o queso Quark)
mas cebolla roja picada
ensalada de judías rojas (receta a seguir)

Elaboración:

Mezclar los ingredientes para las hamburguesas hasta la sal y pimienta.
Dejar reposar una media hora en la nevera.
(hacer la ensalada de judías y tostar los panecillos mientras esperas)
Formar 8 hamburguesas, y freir a fuego medio alto (utilizar la asadora si la tienes). Quizás necesitarás un rocío de aceite para que no se peguen. También, si humedezcas las manos con un poco de agua, las hamburguesas no se pegarán a tus manos. Sí…soy una fuente de ideas hoy. jeje
Freir unos 3-4 minutos por cada lado, o hasta que estén hechos.
Servir las hamburguesas con una loncha de queso, un poco de lechuga, una buena cucharada de nata ácida (yogur/quark), un poquito más de cebolla y un poco de la ensalada de judías. Yo también piqué un aguacate y lo puse….estaba ricoooo.

Ingredientes para la ensalada de judías rojas:

1 lata de judías rojas, escurridas y enjuagadas con agua
2 tomates roma, sin semillas y picados
2 cucharadas cebolla roja picadita
1/2 vaso maiz dulce
1 diente de ajo majado
1/3 paquete de sazón para chili (una cucharada)
2 cucharadas cilantro picado
zumo de 1 limón
guindilla molida al gusto
sal y pimienta al gusto

Elaboración:

Mezclarlo todo y dejarlo ligar. (esto estaba aún mejor el día siguiente)


July 28, 2008

Tuna Sushi Rocks my World

Filed under: appetizers, asian, fish, seafood, recipes, restaurants, rice — nikki @ 1:49 pm

So, I celebrated another birthday recently.   Yep, 25.  Again.  What?  I’m good at 25, I’ve got several years experience, and I’m sticking with it. ;)  But that is totally not what I wanted to talk about.  What I *did* want to share with you is this recipe I recreated  from the (awesome) restaurant we went to to celebrate for sushi…My Gawd, you guys…this place was just incredible…top floor of the Reina Isabel Hotel, panoramic views of the ocean and beach and islet and all of it’s twinkling glittery lights at night.  The place is called La Parrilla (click here for pics and stuff), and the food was just out of this world.  Fusion is probably the best way to describe the menu…Asian flavors combine with Peruvian and Italian influences to create some of the most fantastic flavor combinations…they also offer local dishes, and fresh fish selections according to season.  To start, we decided upon the tuna sushi, and both of us just went nuts.  I knew this one would be gracing our table at home pronto.  I even kind of impressed my own self with how close I was able to come to the original. heh :D If you like tuna sushi, you are going to love this one, folks.  It is dayumed good.

Ingredients:

1/4 cup sweet soy sauce
1/4 cup rice vinegar
1 tablespoon Mirin
sesame oil to taste (I used about 1/2 teaspoon or so)
2 cups prepared sushi rice
3/4 pound (300 grams) sushi grade tuna
1 ripe avocado
sesame seeds to garnish
chopped cilantro to garnish (I didn’t have any, so I skipped it, but it really does go great with this, so I recommend adding it if you have some)

Preparation:

Prepare your rice and let cool.
Be sure that you specify to your fish monger that you will be eating the fish raw, you’ll want only premium sushi grade tuna for this.
Prepare the sauce.
Mix soy, vinegar, Mirin and sesame oil.
Prepare each sushi plate, chopped avodado on one side, tuna slices in the center, rice at the other side.
Drizzle sauce over tuna.
Garnish with sesame seeds (and cilantro if using).
Eat!

Ingredientes:

4 cucharadas de salsa de soja dulce
4 cucharadas de vinagre de arroz
1 cucharada Mirin
aceite de sésamo al gusto (utilicé una cucharadita de café aproximadamente)
2 vasos arroz de sushi ya preparado
300 gramos de atún para sushi
1 aguacate maduro
semillas de sésamo para adornar
cilantro picado para adornar (no tenía en casa, pero si tienes, te lo recomiendo, el sabor es fantástico)

Elaboración:

Preparar el arroz y dejar enfriar.
Asegúrate de que avisas al pescadero sepa que vas a comer el atún crudo–solo quieres máxima frescura para el sushi.
Preparar la salsa.
Mezclar la soja, vinagre, Mirin y aceite de sésamo.
Preparar cada plato de sushi, aguacate picado por un lado, atún en tiras por el centro, y arroz al atro lado.
Rociar el atún con la salsa.
Adornar con semillas de sésamo y cilantro
A comer!


Next Page »